Showing posts with label Venom. Show all posts
Saturday, May 26, 2012
Venom Mark I Retrofitted
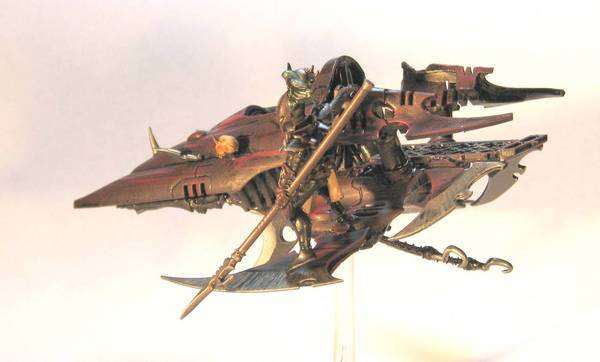
Here is my original Venom I converted from an Eldar Vyper. (Original link Venom Mark I)
After the official version came out, I decided I needed magnetized over/under splinter cannons. I Got the parts off of ebay, and got to work. The gunner has the wyche legs and warrior body. I found the right size drill bit, and drilled a hole for the splinter cannon peg. The gunner also has a small magnet on her left foot to hold her to the venom.
The gun underneath is from the venom kit. I glued a larger magnet in place below the venom, and then put a cutout, round piece of sheet metal on the gun mount, so that it will stick to the magnet, and not take up too much room.
I have been using a 50/50 mix of white glue and water for my decals. I place some glue water mix where I want the decal, cut and soak the decal for 30 secs, and then place it. I then use a paint brush to remove the extra glue, and put some glue over the top of the decal with a paint brush. The Broken Sigil on this side went on well, not so well on the decal below. May have to paint over the white areas you can see above the skull.
Link before the gunner and under-slung splinter cannon were added Venom Mark I
Monday, February 28, 2011
Venom Mark II, Airbrushing Dark Eldar
Here is a pic of my second Venom. It looks a lot like the first venom. I tried a couple of different things while building it, but kept coming back to my original design. At least it will match my other one. I put the hanger-on on the other side, added a shortened raider spear, and added some splinter rifles to the side. I thought it would be cool to have the pilot with his sidearm out, ready to pop a Mon-Keigh. It is about 30% painted or so. I did all the work so far with an airbrush, and will pick out the details now to finish it. This took about 3 minutes to put this amount of paint on it. Vehicles love the airbrush.
Here are some pics of my Ravagers. I also started to airbrush them, and like the look so far. I like the Chinese feel that they have.
This one took about an hour or so of drybrushing, dark lining, and highlighting. I later airbrushed the sails a bit. This one is a little further along, but still needs a lot of paint.
If you look closely, I am holding a magnetized head of the sponson gunner. I wanted to be able to switch out the dark lances and disintegrator cannons and found that the head of the gunner really got in the way of taking out the gunner and replacing the gun. Once the head was removed, you can remove the gunner very easily. With the way the arms, gun, and weapon mount work together, you don't really need to glue anything in place.
Great model.
Here you can see I magnetized the front weapon mount. Pretty easy really. The weapon shield/mount stays together well with a press fit, but the gun would always come apart when I tried to put the mount into the front of the raider/ravager. This way the gun stays together when you put the magnets together. I have found that the gunner holds the gun pretty well without magnets or glue, so a weapon swap is pretty easy. I magnetized one, but found it is not really necessary. We'll see if they hold up after a few more games.
Here are my Reaver jetbike squads. You can see I have a lot of work to do still on the pilots, and the bikes, but they are coming along. The rear three were painted in a more conventional way, but I like the yellow addition to the cowling. The pilots are probably going to get a yellow racing stripe down their racing leathers as well.
They look pretty impressive all together. Just two more raiders to finish assembling and basecoating. Don't worry, I am going to do something about those nasty yellow fronts. I will definitely tone them down a bunch.
Airbrushing all three ravagers, the venom, and twelve reavers took only about an hour. That included set up and clean up time.
One last thing and then I will shut up, If you get an airbrush, I would invest in some good airbrush paint. Mixing is a hassle, and I got the yellow wrong so I had to do it 3-4 times. Then I got it too thick and you can see some splattering on the ravager sails and reaver cowling. The red paint was airbrush paint and I just poured it into the airbrush. The yellow I mixed myself and was at first too thin, then too thick. Too thin meant it disappeared after it dried, and too thick meant it splattered. Live and learn.
Here are some pics of my Ravagers. I also started to airbrush them, and like the look so far. I like the Chinese feel that they have.
This one took about an hour or so of drybrushing, dark lining, and highlighting. I later airbrushed the sails a bit. This one is a little further along, but still needs a lot of paint.
If you look closely, I am holding a magnetized head of the sponson gunner. I wanted to be able to switch out the dark lances and disintegrator cannons and found that the head of the gunner really got in the way of taking out the gunner and replacing the gun. Once the head was removed, you can remove the gunner very easily. With the way the arms, gun, and weapon mount work together, you don't really need to glue anything in place.
Great model.
Here you can see I magnetized the front weapon mount. Pretty easy really. The weapon shield/mount stays together well with a press fit, but the gun would always come apart when I tried to put the mount into the front of the raider/ravager. This way the gun stays together when you put the magnets together. I have found that the gunner holds the gun pretty well without magnets or glue, so a weapon swap is pretty easy. I magnetized one, but found it is not really necessary. We'll see if they hold up after a few more games.
Here are my Reaver jetbike squads. You can see I have a lot of work to do still on the pilots, and the bikes, but they are coming along. The rear three were painted in a more conventional way, but I like the yellow addition to the cowling. The pilots are probably going to get a yellow racing stripe down their racing leathers as well.
They look pretty impressive all together. Just two more raiders to finish assembling and basecoating. Don't worry, I am going to do something about those nasty yellow fronts. I will definitely tone them down a bunch.
Airbrushing all three ravagers, the venom, and twelve reavers took only about an hour. That included set up and clean up time.
One last thing and then I will shut up, If you get an airbrush, I would invest in some good airbrush paint. Mixing is a hassle, and I got the yellow wrong so I had to do it 3-4 times. Then I got it too thick and you can see some splattering on the ravager sails and reaver cowling. The red paint was airbrush paint and I just poured it into the airbrush. The yellow I mixed myself and was at first too thin, then too thick. Too thin meant it disappeared after it dried, and too thick meant it splattered. Live and learn.
Monday, November 29, 2010
Dark Eldar Venom MK I
Here is my finished Venom for the BOLS venom competition. Once the link is up to vote, I will definitely put it up.
I wanted to make a venom from all leftover parts, so all I would have to buy is a vyper. The warrior is magnetized for easy removal/transfer to another vehicle. It actually went together rather quickly, and this was also the test color for my new dark eldar army. I have two blue armies and a green, so I wanted a red army. I think the colors look pretty good.
I also wanted to do something other than edge highlight all the armor plates like most dark eldar vehicles. Its a great look, but takes forever and I wanted something different. I went for a quick and nasty dry-brush/streaked look. I think I will clean it up a bit, but was in a hurry to finish the model. I really like the new models and can't wait to put together a bunch of warriors and wyches.
I think the key to designing dark eldar vehicles is to make them spikey, streamlined, and elegant. If you get too over-the-top crazy, it starts looking too much like chaos. Dark Eldar may be depraved, but its a classy, refined depravity.
I wanted to make a venom from all leftover parts, so all I would have to buy is a vyper. The warrior is magnetized for easy removal/transfer to another vehicle. It actually went together rather quickly, and this was also the test color for my new dark eldar army. I have two blue armies and a green, so I wanted a red army. I think the colors look pretty good.
I also wanted to do something other than edge highlight all the armor plates like most dark eldar vehicles. Its a great look, but takes forever and I wanted something different. I went for a quick and nasty dry-brush/streaked look. I think I will clean it up a bit, but was in a hurry to finish the model. I really like the new models and can't wait to put together a bunch of warriors and wyches.
I think the key to designing dark eldar vehicles is to make them spikey, streamlined, and elegant. If you get too over-the-top crazy, it starts looking too much like chaos. Dark Eldar may be depraved, but its a classy, refined depravity.
Subscribe to:
Posts (Atom)